The new Profit and Loss Analysis page provides more flexibility and customisation options for better readability and analysis of reports. For example, you can group low importance/value accounts and just show a subtotal so that they don’t draw attention away from more important accounts. You can also change the order in which accounts display to show the most important accounts or groups at the top of each section. You can save the layouts you create and quickly re-use them on another page for that organisation.
The page already appears in the default templates, but if it doesn’t appear in your report you can easily add it:
Open the Customise Layout tab, then click Add Page.
From the Page Type screen, choose the new Profit and Loss Analysis page.
Rename the page if required.
From the Insert After drop-down list, choose which page you want to insert the new page after.
Click Save.
To amend the Profit and Loss Analysis page
Add a new layout
From the Customise Layout tab, locate the page, then click Customise.
Click New Layout.
Delete a saved layout
Note: Once you remove a layout, you cannot undo this.
From the Customise Layout tab, hover the mouse over the new Profit and Loss Analysis page, then click Customise.
View the page settings by clicking the Show Settings link in the upper right corner of the page.
Click the trash icon alongside the layout you want to delete.
Note: A layout cannot be deleted if it is the active layout in another Profit and Loss Analysis page within your report.
Edit a layout
From the Customise Layout tab, hover the mouse over the new Profit and Loss Analysis page, then click Customise.
View the page settings by clicking the Show Settings link in the upper right corner of the page.
Select the layout you want to edit and click the small pencil icon alongside the saved layout.
Note: Edits made to a layout apply to all pages which use the saved layout.
Re-order accounts/groups
Click to select the account(s) or group you want to re-order.
Drag the selected option(s) and drop into the required position.
Note: You cannot use drag and drop to move accounts from one section (e.g. Revenue) to a different section (e.g. Cost of Sales). Instead, you will need to consider changing the report code from the Customise Data tab.
Add a group
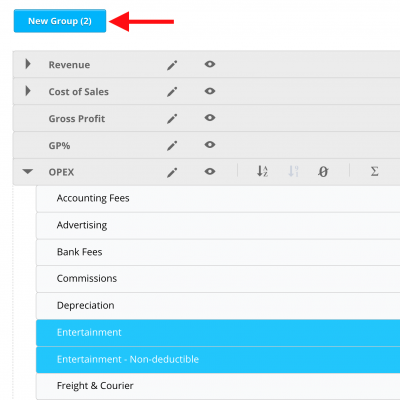
Click to select the account(s) you want to group.
Once you've selected the required accounts, click the New Group button.
Complete the window as follows:
Enter the name for the group
Select to display the accounts within the group as detailed or summary
Select the sorting type.
Check to show or hide zero value accounts from the group
Check to show or hide the group's subtotal
Group options
Once you've added your group, you can adjust the formatting by using the icons in the group header. There are several options available:
Note: To add more accounts into the group, click and drag accounts from the same section into the group. To remove accounts from the group, click and drag accounts out of the group.